Kombucha Carbonation Tips For A Bubbly Brew (Aka Fizzy Booch!)
Most people enjoy having at least some bubbles in their Kombucha. A fizzy glass of booch can be fun, adds to the flavor, and offers a “natural soda” type of experience, all of which have helped Kombucha become so popular. But it’s also true that Kombucha carbonation can be a tricky thing to master at first.
Utilizing these tips and tricks will help infuse your brew with more Kombucha carbonation than ever before. Just be careful not to overdo it! (tips about that below too)
Once you have a routine, bottling a bubbly brew will be second nature.
*click to jump to each tip
Basic Kombucha Carbonation Tricks
- Add Heat to the First Fermentation
- Stir the Brew Prior to Bottling
- Second Ferment in a Bottle or Closed Container
- Fill The Bottle To The Top
- Add A Little Sugar/Fruit/Juice/Flavor
- Leave The Bottles At Room Temperature (No Fridge)
- Add Heat to the Second Fermentation
Advanced Kombucha Carbonation Tricks
- Take Starter Liquid From the Bottom
- Increase the Power of the Tea Infusion
- Add Eggshells (or Calcium carbonate)
*Bonus – How To Make a Flat Kombucha Brew
Each Kombucha culture has its own variety of bacteria and yeast which work in symbiosis to ferment tea and sugar into Kombucha. The yeast get started first consuming the sugar to create small amounts of ethanol (alcohol), acids, enzymes, and carbon dioxide (our fizz factor!).
The Yeast/Bacteria Relationship
The bacteria wake up a few days into the process and begin consuming the ethanol, converting it into more healthy acids. During this time, the yeast become less active and often rest at the bottom of the vessel. 
The balance between the yeast and bacteria can be a delicate one. If there is too much yeast in your brew, it can cause the bacteria to struggle; the other way around and your brew has little to no fizz. As always in life, strive for the ideal balance for optimum results.
What is carbonation?
When CO2 (Carbon Dioxide) dissolves into a liquid and is kept under some pressure, carbonation results. When that pressure is released, so are the bubbles, and that brings the lip tickles.
Is all carbonation the same?
There are natural and man-made versions. Force carbonating Kombucha is adding it by machine at bottling time. Natural carbonation builds mostly in the bottle after the brew is capped tightly. Most bottled brands add bubbles, and they are not required to say so on the label.
Does Kombucha need to be carbonated?
Is flat Kombucha safe?
Does non carbonated Kombucha Have Fewer Benefits?
Kombucha does not need to be carbonated to be safe or delicious to drink. And flat Kombucha has the same nutritional components, carbonated is not healthier. Some people don’t like their Kombucha too fizzy, finding that the carbon dioxide bothers their system. Others just like the taste of non carbonated Kombucha. Unlike sodas, it can still be yummy this way.
For the rest of us, bubbles are a fun and tasty part of the Kombucha brewing experience. The “living” energy of the drink is on full display as a fizzy glass of iced Kombucha froths to the lip of the glass.
-
Sale!

JUN Tea Brew Kit for Sale – 1 Jun Culture
Rated 5.00 out of 5$99.35Original price was: $99.35.$74.88Current price is: $74.88. Add to cart -
Sale!

Ferment Friend Heater with Thermostat Control
Rated 4.98 out of 5$179.95Original price was: $179.95.$149.95Current price is: $149.95. Add to cart -

Replacement GT Synergy/KeVita Kombucha Bottle Caps
Rated 4.97 out of 5$7.95 – $12.95 Select options This product has multiple variants. The options may be chosen on the product page -
Sale!
Kombucha SCOBY Culture
Rated 4.99 out of 5$38.88Original price was: $38.88.$28.88Current price is: $28.88. Add to cart
Kombucha Carbonation VIDEO:
Kombucha is Living Tea!
—————————
But wait! Kombucha is fermented in an open container, uses a cloth cover and requires air circulation. How can CO2 build up? The answer is your SCOBY. As it grows on top, it makes a seal to the sides of the brewing vessel, trapping at least some of the newly created gasses inside. Have you noticed your SCOBY developing a lot of holes or bumps? If so, that is the CO2 (and other gasses) trying to escape. Totally normal.
Kombucha Carbonation: What to Expect?
So why isn’t your Kombucha bubbly? Let’s talk about expectations. Most people have experienced carbonation in two forms: soft drinks and beer. These products essentially all contain machine-made bubbles via the force carbonation process (anyone who has accidentally sipped a flat soda or beer knows they are gross without fizz).
Machine-Made vs Natural Carbonation
If you want to know the difference between natural and artificial carbonation, pay close attention next time you pour a commercial soda or beer into a glass. Artificial bubbles are more uniform (and on the large side), stick to the side of the glass, and do not tend to “interlace” each other. They also dissipate more quickly and are more “aggressive” in the mouth, producing a “harder” taste. Natural carbonation, even when it causes the bottle to overflow on opening, delivers softer, soap-like bubbles that tickle rather than burn.
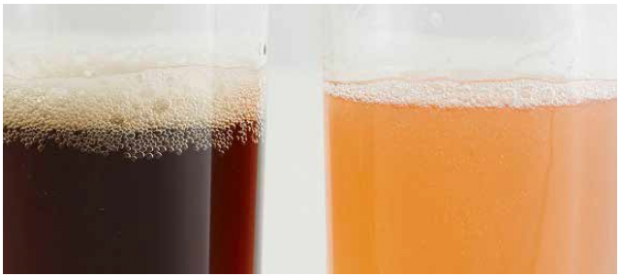
Photography by © Matt Armendariz, from The Big Book of Kombucha, © by Hannah Crum and Alex M. LaGory, used with permission from Storey Publishing.
This means that when considering if your brew is “fizzy enough,” it may just be a matter of perspective. The amount of bubbles may vary. A little carbonation can go a along way, especially if one is not expecting their Kombucha to look like a Coke when it’s poured. Be more sensitive to the natural effervescence that is present and you may find your Kombucha is plenty carbonated just as it is.
![]() KMamma Sez: Don’t forget to burp your bottles! That means opening them occasionally to see how much pressure has built. This helps you learn how active your brew is and how effective you are at building carbonation. The sound the bottle makes when you open it is the “burp!” If it’s loud, you’re well on your way to building bubbles, consider moving to the fridge soon. If not, burping Kombucha less frequently until you start building pressure is recommended. After you move the bottles to the refrigerator, you won’t need to be burping Kombucha bottles anymore!
KMamma Sez: Don’t forget to burp your bottles! That means opening them occasionally to see how much pressure has built. This helps you learn how active your brew is and how effective you are at building carbonation. The sound the bottle makes when you open it is the “burp!” If it’s loud, you’re well on your way to building bubbles, consider moving to the fridge soon. If not, burping Kombucha less frequently until you start building pressure is recommended. After you move the bottles to the refrigerator, you won’t need to be burping Kombucha bottles anymore!
Basic Kombucha Carbonation Tricks
“But I Still Need More Kombucha Carbonation! Help!” If the bubbles are not enough, or there just aren’t any, there are a lot of ways to potentially boost the brew. Keep in mind that trying ALL of these tips at once is NOT advised. That may lead to bottle overflows! Instead, one or two at a time should help move the brew to more activity.
CLICK HERE for more on Bottling Safely
Although this first batch of tips is labeled as “Basic,” most people will never need anything more advanced. In fact, these are the only techniques we use regularly. The “Advanced” tricks below are more for experimentation. Stick to these tips for everyday brewing.
Add Heat During Primary Fermentation
We already know that keeping the Kombucha brew in the right temperature range helps prevent mold and produce a delicious flavor. But heat also helps create enough happy and healthy yeast to make the bubbles. If the brew is too cold, fizz is unlikely. 75-85°F (24-30°C) is recommended for best results during Kombucha primary fermentation.
Stir the Brew Prior to Bottling
This works with Batch Brew or Continuous Brew. With Batch Brew, always be sure to remove the starter liquid for the next batch first (unless you are using a SCOBY Hotel for starter liquid). The give the brew a stir to mix all the yeast from the bottom of the vessel into the liquid. Quickly decant so that even amounts of yeast end up in each bottle. The extra should help boost bubbles, but only if the right conditions are also provided.
With Continuous Brew, you don’t have to worry about removing the starter liquid, so all that is needed is to gently move the SCOBY aside with a spoon and give the brew a nice stir prior to decanting via the spigot. Doing this has the added advantage of reducing the total amount of yeast in your CB, which may mean you can clean and re-set it less often. More bubbles and less maintenance, win-win!
Second Ferment in a Bottle or Closed Container
While some light bubbles will build under the SCOBY during primary fermentation, the second ferment is when most Kombucha carbonation builds. At this stage of the process, there are 3 tricks to employ.
The common requirement for all of these methods is: You must have a tight cap for your bottles or container. Reusing commercial Kombucha bottles is a great idea to start, but over time the caps can wear out. Using Replacement Caps or sourcing better bottles for ferments such as swing-tops will improve carbonation as well since these will seal in the Carbon Dioxide more effectively.
Fill The Bottle To The Top
Leaving just a centimeter or so of space forces more Carbon Dioxide to remain dissolved in the liquid, making it less likely to escape through the bottle seal.
Add A Little Sugar/Fruit/Juice/Flavor
Yes sugar! Sugar is what sparks yeast the most, and the yeast are responsible for the bubbles. 1/2 teaspoon of straight sugar per 16oz bottle should crank up the Kombucha carbonation. Ginger can have a strong effect. Even flowers such as chamomile have natural yeast that may boost the bubbles. Fruit or juice can do the same, especially pureed fruit which really fires up the fizz. Be careful!
CLICK HERE for more on Flavoring Kombucha
Leave The Bottles At Room Temperature (No Fridge)
Although most people find they can and even should move their Kombucha to the refrigerator after a few days of second ferment, it is not required to do so. Instead, you can leave them at room temperature to continue building carbonation, especially if you are checking the bottles and no bubbles are happening yet. This also works if you have chilled your brew and found that Kombucha loses fizz in the refrigerator. 1-2 hours at room temperature is often enough to “re-awaken” the brew. The cold liquid stores more CO2, so as it warms up, the bubbles are released and ready to rumba.
*Note: If you leave them at room temperature for an extended time, storing bottles in a closed box, cooler, or other contained space can help prevent any issues should the pressure become to much and cause the bottles to overflow or explode.
Add a Little Heat to the Second Ferment
Especially in winter, adding a heater to the second ferment might be necessary to create bubbles. The very cold conditions reduce the activity of the yeast. Also, colder liquid can hold more CO2, but when warmed the bubbles are pushed to leave the liquid. As always, check to make sure you don’t overstimulate the brews.
Over Carbonated Kombucha
Before we get to the advanced techniques, keep in mind that it is possible to have too much Kombucha carbonation. There are typically easy ways to reduce the bubbles. The most common cause of too much carbonation is too much flavoring used, especially fruit or juices. Using less flavoring always reduces bubbles.
You could also filter the beverage prior to bottling to reduce the amount of yeast present. Conducting second ferment at lower temperatures in a cooler area like a basement or pantry can lower the pressure. Finally, putting the bottle in the refrigerator for at least 15 – 30 minutes should fizzle the fizz. Any one of these tricks might help, but all of them together could reduce bubbles to nothing, so experiment with what works for you.
*Note: If you are losing a lot of Kombucha to overflowing bubbles when you open the bottle, consider placing the bottle inside a clean bowl in the sink. Then place a new plastic food storage bag over the top. When the bottle is opened, the liquid will be contained in the bag and should run down into the bowl. It can then be recaptured for drinking.
Advanced Kombucha Carbonation Tricks
Tried all the above tips and still not getting any fizz? Here are a couple of advanced Kombucha Carbonation techniques. We recommend trying the basic tips first, as these tricks can alter the balance of the brew permanently. But if you have given the others a shot, try these.
Take Starter Liquid From the Bottom
Yeast is distributed throughout the Kombucha liquid, whether you can see it or not. Once the yeast have done their job, they collect at the bottom of the brewing vessel. When they join together, they form the brown strings you see in the photo.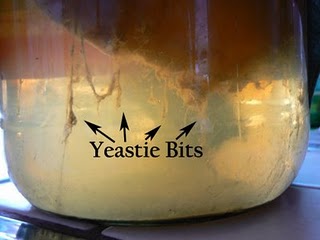
Normally, in order to preserve a healthy balance of bacteria & yeast, the starter liquid is pulled from the top prior to bottling. However, if we are looking to boost our yeast quotient, bottling first and then using the starter left at the bottom of the jar for the next batch is one way. This technique should not be repeated in consecutive batches.
Increase the Power of the Tea Infusion
There are 2 ways to increase the power of the tea: use more tea and/or steep the tea longer. Whichever method we choose, by infusing a more robust tea base, we have provided more fuel for the yeast to consume. The caffeine and other nutrients present in the tea will stimulate the yeast to remain active rather than allowing them to take their normal rest cycle. More bubbles should result over 1-2 batches. Then return to the normal recipe.
Add Eggshells (or Calcium carbonate)
Due to the calcium and mineral content, eggshells can boost the bubbles and reduce the sourness of the brew. However they must be cleaned very well and then baked at 200 degrees for at least 10 minutes prior to be added to the Kombucha. The shells may affect the flavor. Remove prior to bottling. Or Calcium carbonate can be substituted, added according to the manufacturer’s instructions.
![]() KMamma Sez: “What if I want my Kombucha to be totally flat?” The best way to accomplish non carbonated Kombucha is to do the opposite of our tips. For example:
KMamma Sez: “What if I want my Kombucha to be totally flat?” The best way to accomplish non carbonated Kombucha is to do the opposite of our tips. For example:
- Ferment until the Kombucha is tart and all the sugar is gone
- Ferment at lower temperatures, closer to 70 degrees F
- Strain the yeast at bottling time
- Bottle with loose lids, or leave slightly untightened (not enough to let in fruit flies)
- Do not add any flavoring (or try cinnamon chips which can mellow bubbles)
- Leave extra space at the top of the bottles (do not fill all the way)
- Move the bottles to the refrigerator immediately
